Contact Us

Use the form on the right to contact us.

You can edit the text in this area, and change where the contact form on the right submits to, by entering edit mode using the modes on the bottom right. 

2210 Haines Avenue
Rapid City, SD, 57701
United States

605-341-5044

Someone's In the Kitchen is an independent, gourmet kitchenware store in Rapid City, South Dakota. We are your shop for "all things kitchen". Enjoy a leisurely shopping experience in the world of kitchen and home.

RECIPE ARCHIVE IV

Bacon, Cheddar, and Jalapeno Skillet Cornbread

Lia Soneson

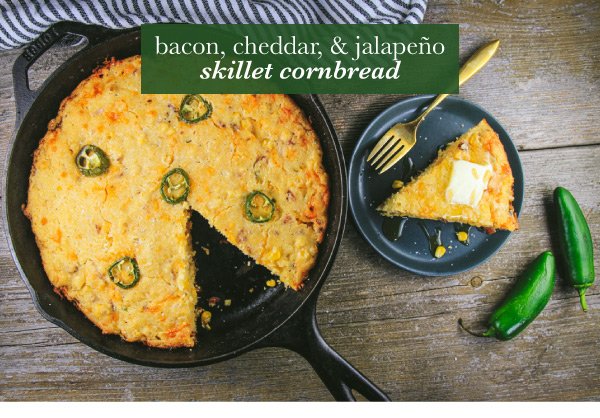
This savory cornbread is packed with flavor! Add-ins of bacon, cheddar cheese, shallot, corn, and jalapeño peppers turn this not-so-average side dish into a feature dish. We recommend enjoying this extra-moist cornbread warm with a dab of butter and a drizzle of honey (or maybe some hot honey for a little extra kick)!


Bacon, Cheddar, and Jalapeno Skillet Cornbread
Makes 8 wedges

Ingredients:

6 slices bacon, cooked and crumbled
1 cup yellow cornmeal
1 cup all-purpose flour
1 tablespoon baking powder
1/2 teaspoon salt
1/4 teaspoon black pepper
1 cup corn kernels (fresh or frozen)
2 tablespoons minced shallot
1 cup extra sharp cheddar cheese, coarsely grated
1 jalapeño, one half sliced crosswise, one half diced
1-1/3 cups buttermilk
1/3 cup melted butter, plus
1 tablespoon, divided
1/2 cup plain unflavored Greek yogurt
1 large egg, beaten

Directions:

1. On the stove top, cook the bacon in a 10-inch cast iron skillet until crispy. Remove and let drain on a paper towel-lined plate. Once cooled, crumble or cut the bacon into bits. Wipe out the excess bacon grease from the pan.

2. Preheat the oven to 375 degrees F. Place the cast iron skillet in the oven to preheat as the oven preheats.

3. In a large mixing bowl, combine the dry ingredients: the cornmeal, flour, baking powder, salt, and pepper and whisk together until evenly combined. Fold into the flour mixture, the cooked bacon, corn kernels, shallot, grated cheese and diced jalapeño (save a handful of the cheese and the jalapeño slices for a top garnish on the batter).

4. In a separate bowl, mix the wet ingredients together. Whisk the buttermilk, melted butter, yogurt, and egg together. Pour the mixture over the dry ingredients and stir with a spoon until just combined.

5. Use quality hot pads to remove the preheated cast iron skillet from the oven and melt the remaining 1 tablespoon of butter in the hot skillet. Immediately pour the cornbread batter into the prepared pan and sprinkle with the reserved jalapeño slices and grated cheese.

6. Bake the cornbread for 20-25 minutes, or until the top is golden. Serve warm, with butter and honey, or even hot honey for a little extra kick!

Butternut Squash Soup with Melted Brie and Honey Crostini

Lia Soneson

Creamy, savory butternut squash soup is an autumn favorite! Pair it with crostini topped with Brie, honey, and thyme to make a simple dinner something a little more special!


Butternut Squash Soup with Melted Brie and Honey Crostini
Serves 6 - 8

Soup Ingredients:

1 butternut squash
1 tablespoon olive oil
2 tablespoons butter
1 yellow onion, peeled and chopped
3 cloves garlic, minced
1 shallot, finely diced
1 large carrot, peeled and chopped
1 apple, peeled and chopped
2 stalks celery, chopped
1/2 teaspoon Kosher salt
1/4 teaspoon black pepper
1/8 ground nutmeg
1/8 teaspoon smoked paprika
1 teaspoon fresh rosemary, minced
Drizzle of heavy cream
6 cups vegetable broth

Crostini Ingredients:

1 baguette
1 tablespoon olive oil
8.8 oz Brie
1 tablespoon honey
1/2 tablespoon fresh thyme leaves

Directions:

1. Prep the butternut squash. Cut off the ends of the squash and across at the “waist.” Peel the skin with a knife or a vegetable peeler. Cut the base in half and scoop out the seeds. Slice and dice the squash into roughly 3/4" cubes.

2. In a large Dutch oven, add the olive oil and butter until the butter melts. Add the chopped onion, garlic, shallot, carrot, apple, and celery. Sauté for 5 minutes over medium heat, stirring frequently.

3. Add the cubed butternut squash and season it with salt, pepper, nutmeg, smoked paprika, and fresh rosemary. Stir to coat, then cover and cook for 15 minutes, stirring occasionally.

4. Add the vegetable stock, and bring the ingredients to a low boil over medium heat. Boil for 5 minutes. Reduce the heat to low, cover, and simmer for 15 minutes or until the butternut squash is fork tender.

5. While the soup is simmering, preheat the oven to 450 degrees F. Slice the baguette into slices and place on a rimmed baking sheet lined with parchment paper. Brush the slices with olive oil. Slice the Brie into 1/2" thick slices and place on the baguette slices. Bake for 5 minutes or until the bread begins to brown and get crispy. Remove from the oven and drizzle with the honey and sprinkle with the thyme leaves.

6. Using an immersion blender, purée the soup until smooth. Take care not to let the hot soup splatter. Ladle out servings, and top each bowl with a drizzle of heavy cream, and additional salt and pepper. Serve the prepared crostini onthe side.

Pasta con le Melanzane (Eggplant Pasta)

Lia Soneson

It's pasta night! Fresh eggplant strips are fried, smothered in a fresh tomato sauce, then paired with hearty rigatoni in this pasta con le melanzane dish. You’ll find that it’s perfect for cozy dining any day of the week. Bring it all home by topping the pasta with fresh mozzarella, tangy Pecorino Romano, and chopped fresh herbs.


Pasta con le Melanzane (Eggplant Pasta)
Serves 6

Fried Eggplant Ingredients:

2 large eggplants
2 tablespoons salt
1 cup vegetable oil
1/4 cup capers

Tomato Sauce Ingredients:

8 ripe Campari or Roma tomatoes, washed
1/2 cup olive oil
4 cloves garlic, sliced
1 small yellow onion, finely chopped
1/2 teaspoon Kosher salt
1/4 teaspoon freshly cracked pepper
1/4 teaspoon crushed red pepper

Pasta and Toppings Ingredients:

1 lb rigatoni pasta
1/4 cup grated Pecorino Romano
1-3/4 oz fresh mozzarella, sliced
2 tablespoons fresh parsley, chopped
2 tablespoons fresh basil, chiffonade

Directions:

1. Prepare the eggplant. Wash the eggplant and slice it into rounds about 1/4" thick. In a large bowl, cover the sliced eggplant in water and add 2 tablespoons salt. Press the eggplant down with a heavy bowl so the slices stay under water and soak for 30 minutes. (This salt water soaking process helps extract any bitterness from the eggplant, and renders a creamier texture.) Drain and rinse the eggplant. Pat the eggplant dry in preparation for frying.

2. While the eggplant is soaking, make the pasta sauce. Squeeze the ripe tomatoes in a large bowl of water to help release and remove their seeds. Finely dice the tomatoes. Heat the olive oil in a large pan and add the sliced garlic. Cook the garlic over medium heat for 2-3 minutes until it becomes fragrant. Add the diced onion and cook for another 4-5 minutes until the pieces begin to soften. Add the crushed, chopped tomatoes, salt, pepper, and crushed red pepper and cook on low for about 20 minutes until the sauce beings to thicken and the flavors become incorporated.

3. Fry the eggplant. Slice the eggplant rounds into strips and coat the bottom of a large stainless steel pan with half of the vegetable oil. Over medium high heat, heat the oil. Once the oil is hot, working in batches, carefully add the eggplant slices in a single layer in the pan. Once the slices have browned, remove them with tongs and continue with the next batch until all the slices have been fried. Add remaining oil as needed during the frying. Place the fried strips on a paper towel-lined plate to absorb any excess oil. Add the capers to the oil and fry for 2-3 minutes until golden brown. Use a slotted spoon to remove the capers and place them on a paper towel-lined plate to absorb any excess oil.

4. Cook the pasta in a large pot of boiling, salted water for about 8 minutes, or until al dente. Drain the pasta. Combine the pasta, sauce, fried eggplant, and capers. Toss together to incorporate. Top with Pecorino Romano, mozzarella, parsley and basil and eat while piping hot.

Spicy Refrigerator Bread and Butter Pickles

Lia Soneson

Nothing quite compares to the fresh crunch of a homemade pickle! These sweet, tangy, bread-and-butter pickles need only one night in the refrigerator before they can be happily snacked upon. Add the crispy, green pickles to anything from hamburgers, to salads, or charcuterie boards.


Spicy Refrigerator Bread and Butter Pickles
Makes (3) 12-oz. jars

Pickle Ingredients and Supplies:

1-1/2 pounds pickling cucumbers
2 tablespoons Kosher salt
1 yellow onion, sliced
(3) 12-oz glass canning jars with sealing lids

Brine Ingredients:

1-1/4 cups granulated sugar
1 cup white vinegar
1/2 cup apple cider vinegar
2 tablespoons mustard seeds
1 teaspoon celery seeds
1/2 teaspoon turmeric
1/2 teaspoon whole black peppercorns
1/2 teaspoon crushed red pepper flakes
1 teaspoon whole cloves
2 cloves garlic, sliced
Dill sprigs

Directions:

1. Wash and sterilize the jars using boiling water.

2. Use a vegetable brush to scrub the cucumbers in hot water, rinsing off any dirt.

3. On a large cutting board, use a chef's knife or a crinkle cut slicer to cut the cucumbers into 1/4" slices. Slice the yellow onion in half, then thinly, pole to pole.

4. In a large mixing bowl, toss the cucumbers with salt and the sliced yellow onion. Place the salted cucumbers and onions in the refrigerator. Refrigerate for 1-1/2 hours.

5. Remove the cucumbers and onion from the refrigerator and place in a colander and thoroughly rinse off the salt with cold water.

6. Evenly distribute the cucumber and onion slices into the prepared jars and set aside.

7. Prepare the brine by combining the white sugar, white vinegar, apple cider vinegar, mustard seeds, celery seeds, turmeric, peppercorns, crushed red pepper, whole cloves, and garlic in a medium saucepan. Over medium heat, bring the brine to a simmer until the sugar completely dissolves.

8. Pour the hot brine over the pickles and onions that were previously placed in the jars. Stir to incorporate. Add the fresh dill to the top of the pickles. Let the mixture stand at room temperature for 1 hour to cool, then add the lids and refrigerate for 24 hours before enjoying! These pickles are good in the refrigerator for up to 2 weeks.

Warm Potato Salad with Green Beans and Caramelized Onions

Lia Soneson

Looking for a reliable summer side to accompany your next dinner? Look no further. This potato salad with green beans and caramelized onions is a flavor powerhouse! With a tangy dressing that soaks into still-warm potatoes, and a healthy smattering of zesty dill and bright, herbaceous parsley, this side dish may easily be upgraded to main course status, if you so desire.


Warm Potato Salad with Green Beans and Caramelized Onions
Serves 6

Salad Ingredients:

4 tablespoons butter
2 yellow onions, sliced pole to pole
1 teaspoon Kosher salt, plus 1/2 tablespoon
2 lbs baby potatoes
1/2 lb green beans, trimmed and halved
1/2 cup fresh dill, chopped
1/2 cup fresh parsley, chopped

Dressing Ingredients:

1 clove garlic, minced
1 small shallot, finely chopped
1/3 cup olive oil
1 tablespoon apple cider vinegar
1 tablespoon sherry vinegar
1/2 tablespoon Dijon mustard
1/2 tablespoon stone ground mustard
1/2 teaspoon black pepper
1 teaspoon Kosher salt

Directions:

1. In a wide-mouthed jar, whisk together all of the dressing ingredients until emulsified. Set aside.

2. In a large saucepan over medium-low heat, melt the butter. Add the sliced onions, sprinkle with 1 teaspoon salt and cook on medium low, stirring occasionally until onions have begun to brown and caramelize, roughly 25-30 minutes.

3. Meanwhile, place the potatoes in a large pot and cover them with about 2" of cold water. Cover with a lid and bring the water to a boil. Add 1/2 tablespoon of salt and reduce the heat to medium, continuing to softly boil the potatoes until they are tender and may easily be pierced with a fork, roughly 15 minutes.

4. Add the green beans to the pot, cover, and cook for one more minute. Strain the potatoes and green beans in a colander.

5. While the potatoes are still warm, slice them in half, or into quarters if they are quite large. Place them in a large mixing bowl with the green beans, caramelized onion, parsley, dill, and any remaining butter drippings from the onions.

6. Toss everything with the dressing until evenly coated. Serve warm with additional salt and freshly cracked black pepper to taste.

Peach and Tomato Caprese Salad with Pine Nuts, Prosciutto, and Tarragon Oil

Lia Soneson

We love caprese-style salads, and this version with ripe summer peaches, toasted pine nuts, and salty prosciutto takes a classic dish to new heights. Drizzled with tarragon oil and served with crusty bread and a glass of chilled wine, this salad delightfully celebrates some of the best flavors that summer has to offer!


Peach and Tomato Caprese Salad with Pine Nuts, Prosciutto, and Tarragon Oil
Serves 4 - 6

Ingredients:

1/2 cup (or about 3 large) fresh tarragon sprigs
1/2 cup olive oil
4 heirloom tomatoes, quartered and sliced
3 peaches, pitted and sliced into wedges
1/4 red onion, sliced very thin with a mandoline
1/4 cup pine nuts
8 oz burrata cheese, torn into large pieces
2 oz prosciutto, cut into long strips
1/4 teaspoon Kosher salt
1/4 teaspoon freshly cracked black pepper
1/4 teaspoon Aleppo pepper flakes
1/2 tablespoon red wine vinegar
1/2 tablespoon balsamic vinegar
1/2 tablespoon honey
1/2 cup fresh basil
Flake salt

Directions:

1. Make the tarragon oil. Prepare a small ice bath and set aside. Bring a small pot of water to boil. Salt the water and blanch the tarragon leaves in the boiling water for 10 seconds (the leaves should turn a brighter shade of green), remove from heat. Use tongs to transfer the tarragon to an ice bath to stop the cooking process. Remove from the water. Drain through a fine mesh strainer and pat dry with a paper towel. Combine the tarragon and olive oil in blender and puree. Strain through a fine mesh sieve and discard any solids. Set aside.

2. Prepare the veggies. Quarter and slice the tomatoes using a sharp, serrated knife. Pit and slice peaches into wedges. Thinly slice the red onion with a mandoline.

3. In a small skillet over medium heat, toast the pine nuts, stirring often until lightly browned, 2-3 minutes. Set aside.

4. Tear the burrata into large pieces, and arrange the tomatoes, peaches, red onion, burrata, and prosciutto on a large platter. Sprinkle with Kosher salt, black pepper, and Aleppo pepper.

5. Drizzle evenly with the tarragon oil, red wine vinegar, balsamic vinegar, and honey. Sprinkle with the toasted pine nuts, basil, and flake salt.

Pineapple Teriyaki Flank Steak on the Grill

Lia Soneson

This simple, tropical marinade that features pineapple juice, transforms flank steak into a succulent, flavorful dinner! Pair the steak with grilled or fresh pineapple, coconut rice, and grilled green onions for a perfect end-of-summer feast.


Pineapple Teriyaki Flank Steak on the Grill
Serves about 4

Ingredients:

1 flank steak (2 lb)

Pineapple Teriyaki Marinade Ingredients:

4 cloves garlic, minced
1-inch fresh ginger, finely grated
2 tablespoons brown sugar
1/2 cup 100% pineapple juice
1/2 cup soy sauce

Directions:

1. Mix the marinade ingredients together in a bowl until well combined.

2. Place the flank steak in a bowl or container with a tight lid. Pour the marinade into the bowl over the steak and cover tightly. Refrigerate for at least 1 - 2 hours or up to overnight.

3. After the steak is marinated, fire up the grill and preheat the grill to high.

4. Reserve the marinade for basting while the steak grills. Boiling the marinade is essential for killing any bacteria. Do this by pouring the marinade into a small saucepan and bring it to a rapid boil. Boil for a minimum of 3 minutes.

5. Once the grill is hot, place the steak on the grill, and cook for 3-4 minutes. Flip once, and baste with the boiled marinade juices and cook for another 3-4 minutes. Continue grilling, flipping, and basting until the internal temperature reaches 135 degrees F for medium-rare.

6. Remove the steak from the grill, and let it rest for 5 - 10 minutes before slicing.

7. Make it a meal! Serve the sliced, flavor-infused flank steak on a bed of coconut rice (see our recipe below). Garnish with grilled green onions and chunks of grilled or fresh pineapple.

Coconut Rice
Makes 6 Servings

2 cups jasmine rice
1 can (14 oz) coconut milk
1-1/2 cups cold water
1/2 teaspoon Kosher salt

1. Rinse the rice in a fine mesh strainer until the water runs clear.

2. In a medium sauce pan with lid, add the rinsed rice, coconut milk, cold water, and Kosher salt. Bring to a boil and stir.

3. Turn the heat to low, cover, and simmer for 15-18 minutes, or until the rice is tender.

4. Remove from the heat and let sit still covered for 10 more minutes, then fluff with a fork and serve warm.

Mango and Kale Salad

Lia Soneson

Juicy mango, crunchy kale, and tropical coconut make for a knock-out combination in this colorful summer salad. Warm notes of curry mixed with fresh and cooling herbs offer a lovely complexity for a hearty meal any time of day.


Mango and Kale Salad
Serves 6-8

Salad Ingredients:

6 cups kale, ribs removed, chopped into bite-sized pieces
1 tablespoon extra virgin olive oil
1/4 teaspoon Kosher salt
1 cup red cabbage, finely shredded with a mandoline
1 mango, diced
3 green onions, finely chopped
1 red pepper, seeded and diced
15-20 cherry tomatoes, halved
1/3 cup peanuts
1/2 cup unsweetened coconut flakes
1/4 cup fresh basil, chopped
1/4 cup mint, chopped
1/4 cup cilantro, chopped

Dressing Ingredients:

1/3 cup coconut milk, full fat
1 tablespoon apple cider vinegar
1 tablespoon green Thai curry paste
1-1/2 tablespoons fresh lime juice
1/2 teaspoon turmeric
1/4 teaspoon Kosher salt
1/2 tablespoon brown sugar
1 garlic clove, minced

Directions:

1. In a large bowl, combine the kale, olive oil, and salt. Massage the kale for 1-2 minutes to break down the fibers.

2. Use a mandoline to finely shred the red cabbage. Pit and dice the mango. Chop the green onion. Seed and dice the red pepper, and halve the grape tomatoes.

3. Combine the peanuts and coconut flakes in a small saute pan and toast over the stovetop for roughly 3 minutes, tossing often until both the peanuts and coconut flakes are lightly toasted. Remove from heat and set aside.

4. Combine all of the dressing ingredients in a wide-mouthed jar. Whisk or use an immersion blender to incorporate.

5. In a large salad bowl, combine all of the salad ingredients, drizzle with the dressing and toss until coated. Eat immediately!

Mango and Kale Salad

Lia Soneson

Juicy mango, crunchy kale, and tropical coconut make for a knock-out combination in this colorful summer salad. Warm notes of curry mixed with fresh and cooling herbs offer a lovely complexity for a hearty meal any time of day.


Mango and Kale Salad
Serves 6-8

Salad Ingredients:

6 cups kale, ribs removed, chopped into bite-sized pieces
1 tablespoon extra virgin olive oil
1/4 teaspoon Kosher salt
1 cup red cabbage, finely shredded with a mandoline
1 mango, diced
3 green onions, finely chopped
1 red pepper, seeded and diced
15-20 cherry tomatoes, halved
1/3 cup peanuts
1/2 cup unsweetened coconut flakes
1/4 cup fresh basil, chopped
1/4 cup mint, chopped
1/4 cup cilantro, chopped

Dressing Ingredients:

1/3 cup coconut milk, full fat
1 tablespoon apple cider vinegar
1 tablespoon green Thai curry paste
1-1/2 tablespoons fresh lime juice
1/2 teaspoon turmeric
1/4 teaspoon Kosher salt
1/2 tablespoon brown sugar
1 garlic clove, minced

Directions:

1. In a large bowl, combine the kale, olive oil, and salt. Massage the kale for 1-2 minutes to break down the fibers.

2. Use a mandoline to finely shred the red cabbage. Pit and dice the mango. Chop the green onion. Seed and dice the red pepper, and halve the grape tomatoes.

3. Combine the peanuts and coconut flakes in a small saute pan and toast over the stovetop for roughly 3 minutes, tossing often until both the peanuts and coconut flakes are lightly toasted. Remove from heat and set aside.

4. Combine all of the dressing ingredients in a wide-mouthed jar. Whisk or use an immersion blender to incorporate.

5. In a large salad bowl, combine all of the salad ingredients, drizzle with the dressing and toss until coated. Eat immediately!

Grilled Pork Tenderloin Bowls with Quinoa, Grilled Corn, Poblanos, Avocado and Spicy Lime Crema

Lia Soneson

Pork tenderloin is perfectly primed for adopting flavorful marinades. Our marinade features key flavor makers: fresh orange and lime juices, soy sauce, garlic, and cumin. The flavorful pork is sliced and served in a hearty bowl made complete with quinoa, grilled veggies, avocado, and all topped with a spicy lime crema. Enjoy!


Grilled Pork Tenderloin Bowls with Quinoa, Grilled Corn, Poblanos, Avocado and Spicy Lime Crema
Serves 4

Ingredients:

1 pork tenderloin (2.5 - 3 lb.)

Pork Marinade Ingredients:

2 cloves garlic, minced
1 tablespoon brown sugar
2 tablespoons orange juice
1 tablespoon lime juice
3 tablespoons soy sauce
2 tablespoons olive oil
1/2 teaspoon Kosher salt
1/2 teaspoon freshly ground black pepper
1/2 teaspoon garlic powder
1/2 teaspoon cumin

Spicy Crema Ingredients:

(Mix all the ingredients together ina small bowl until combined)
1 cup sour cream
Juice of 1 lime
1 tablespoon hot sauce, or more to taste

Bowl Ingredients:

1 red onion, sliced into 1/2-inch slices
2 poblano peppers
4 ears corn
1 cup quinoa
2 cups chicken stock (or substitute water with 1/4 tsp salt)
1 tablespoon lime juice, to stir into the cooked quinoa
2 tablespoons cilantro, minced to stir into cooked quinoa
2 avocados, sliced
Cilantro leaves, for garnish

Directions:

1. Prepare the marinade in a medium bowl by whisking all of the ingredients together.

2. Add the pork tenderloin to the marinade, cover, and refrigerate for at least one hour to allow the flavors to infuse into the meat

3. Prepare the veggies for grilling. Slice the onion into 1/2-inch slices. Halve and seed the poblano peppers. Place the onion slices and pepper halves on a sheet pan with the ears of corn. Drizzle all of the veggies with a little olive oil, and sprinkle with salt and pepper.

4. Fire up the grill! Let the marinated tenderloin warm to room temperature for 20 minutes before grilling.

5. While the meat warms, grill the onion, pepper, and corn. Grill the onion slices until grill marks appear and the onion is cooked to your desired doneness. Grill the pepper halves on both sides until just tender. Rotate the ears of corn until just beginning to show some charred marks on all sides.

6. While grilling the vegetables, cook the quinoa. Using a 2:1 ratio of liquid to quinoa, bring the liquid to a boil, add the quinoa, cover, and reduce the heat to a low simmer. Check after 15 minutes to see if all the liquid has been absorbed and if the quinoa is tender. Once tender, stir in the lime juice and minced cilantro. Cool if serving cold, or keep covered if serving warm.

7. Grill the tenderloin. Place the marinated tenderloin on the hot, well-oiled grill, and sear for 3-4 minutes on each side. Turn until all the sides have seared and browned, and then, turn off one burner (or turn to low) to create a direct-indirect environment. Place the seared tenderloin on the cooler, indirect side, and continue to cook until the internal temperature reaches 145 degrees F.

8. Once the pork tenderloin reaches 145 degrees F, place on a clean plate, and cover loosely with a tin foil "tent" for about 10 minutes. This allows the meat to rest, and the juices to soak back into the meat.

9. While the meat rests, finish preparing the vegetables by cutting the grilled onion slices in half, the grilled pepper halves into strips, and stripping the kernels from the grilled corn. Slice the avocados and wash the cilantro leaves well. Set the prepared veggies aside until ready to assemble the bowls.

10. Slice the grilled tenderloin.

11. Assemble the bowls. Add a scoop of quinoa to each bowl, add slices of grilled tenderloin and then load up on the grilled veggies and avocado slices. Dollop the spicy crema on top and garnish with fresh leaves of cilantro.

Grilled Tuna Steaks with Citrus-Ginger Dipping Sauce and Green Beans

Lia Soneson

Tuna steaks are a such an achievable luxury. They come together in just minutes when seared on the grill. Quality tuna steaks will melt in your mouth. Head to your trusted fishmonger, then let the grill do the work! Paired with charred green beans and a savory citrus-ginger sauce, a delicious dinner is served!


Grilled Tuna Steaks with Citrus-Ginger Dipping Sauce and Green Beans
Serves 2

Tuna Ingredients:

(2) 6-oz fresh ahi tuna steaks(sashimi grade)
2 tablespoons olive oil, divided(for brushing tuna steaks andtossing green beans)
1/4 teaspoon salt
1/4 teaspoon black pepper,freshly cracked
12-oz green beans, washed and trimmed

Ginger Dipping Sauce Ingredients:

1/3 cup soy sauce
1 tablespoon sugar
1 teaspoon rice vinegar
1/2 tablespoon lime juice
1/2 tablespoon lemon juice
1/2 teaspoon grated ginger
1 garlic clove, minced

Serve with:

Wasabi paste
Toasted sesame seeds
2 green onions, sliced

Directions:

1. Combine the soy sauce and sugar in a small saucepan and cook until sugar dissolves. Transfer to a heat safe, wide-mouth jar and whisk in the rice vinegar, lime juice, lemon juice, grated ginger, and garlic until combined. Set aside.

2. Brush the tuna steaks with olive oil and sprinkle with salt and pepper.

3. In a large bowl, toss the green beans with the remaining olive oil.

4. In a grill basket, grill the green beans over high heat for8-10 min; occasionally toss with tongs.

5. Grill the tuna steaks over very high heat for 1 minute on each side until grill marks are achieved, keeping the internal meat red.

6. Serve the tuna steaks and green beans with the dipping sauce and a smear of wasabi. Top with toasted sesame seeds and green onion.

Strawberry and Arugula Salad with an Herbed Vinaigrette

Lia Soneson

Celebrate summer with juicy, ripe strawberries! This colorful arugula and strawberry salad features many complementary flavors when tossed with our bright and tangy basil-mint dressing. You’ll find that this salad pairs perfectly with a glass of crisp, white wine and a slowly setting sun.


Strawberry and Arugula Salad with an Herbed Vinaigrette
Serves 4

Salad Ingredients:

4 large eggs, boiled and halved
5 oz arugula, rinsed and dried
10-12 strawberries, washed and hulled
1/2 fennel bulb, thinly sliced with a mandoline
2 celery stalks, thinly sliced with a mandoline
1 avocado, pitted and sliced
4 oz blue cheese, crumbled
1/4 cup almonds, toasted and coarsely chopped

Herbed Vinaigrette Ingredients:

1 tablespoon fresh mint, finely chopped
1 tablespoon fresh basil, chiffonade
1 tablespoon chives, finely chopped
1 clove garlic, minced
1/3 cup olive oil
1 tablespoon Dijon mustard
1 tablespoon fresh lemon juice, plus lemon zest
1 tablespoon white wine vinegar
1/4 teaspoon Kosher salt
1/4 teaspoon black pepper, freshly cracked

Directions:

1. Prepare the Boiled Eggs: Add the eggs to a saucepan and fill the saucepan with water, covering the eggs with about 1-2 inches of water. Bring water to a boil. Once boiling, immediately turn off the heat, cover the pan with a lid, and let sit for 6 minutes for soft eggs, or 10 minutes for hard eggs. Remove immediately from the boiling water and cool by running under cold water for about a minute. Peel and halve the eggs.

2. Prepare the Salad Ingredients: Rinse and dry the arugula. Wash, hull and slice the strawberries. Use a mandoline to thinly slice the fennel and celery. (Use a guard or glove to protect your fingers). Pit and slice the avocado. Crumble the blue cheese.

3. Toast the Almonds:Over medium low heat, toastthe almonds in a small skilletfor 2-3 minutes tossing occasionally until they are fragrant. (Watch closely to avoid burning). Coarsely chop.

4. Prepare the Vinaigrette: Zest and juice the lemon. In a wide-mouth jar, whisk all of the vinaigrette ingredients together until emulsified.

5. Assemble the Salad: In a large bowl, toss the arugula with 1/2 the vinaigrette until coated. Arrange the remaining salad ingredients on the arugula and drizzle with the rest of the vinaigrette. Add additional salt and pepper to taste and enjoy!

Grilled Poppy Seed Pound Cake with Summer Nectarines and Crème Fraîche

Lia Soneson

Don't forget the grill when it's time to make dessert! This poppy seed pound cake is baked to moist and golden perfection, then thick slices are buttered, grilled, and served with slices of juicy nectarines and a generous dollop of crème fraîche. This dessert is destined to make any summer evening meal truly spectacular.


Grilled Poppy Seed Pound Cake with Summer Nectarines and Crème Fraîche
Makes 2 loaves

Pound Cake Ingredients:

2 tablespoons unsalted butter (for greasing the loaf pans)
3 cups all purpose flour
1 teaspoon salt
1/2 teaspoon cardamom
1-1/2 teaspoons baking powder
1/2 cup vegetable oil
3/4 cup olive oil
3 eggs
1-1/2 cups whole milk
2 cups granulated sugar
1-1/2 teaspoons vanilla extract
1/4 cup sour cream
3 tablespoons poppy seeds

Nectarine Ingredients:

4 tablespoons butter
3 tablespoons sugar
1 tablespoon fresh lemon juice
2 nectarines

Serve with:

1/2 cup crème fraîche

Directions:

1. Preheat the oven to 350 degrees F.

2. Grease two 9" loaf pans with butter.

3. In a large bowl, whisk together the flour salt, cardamom, and baking powder until incorporated.

4. In a stand mixer on low speed, use the paddle attachment to mix the vegetable oil, olive oil, eggs, whole milk, sugar, vanilla, and sour cream until incorporated. Slowly add the flour mixture to the wet ingredients and mix on medium speed for 3 minutes or until the ingredients are evenly incorporated. The batter will be somewhat soupy, don’t worry, this is correct. Use a rubber spatula to fold in the poppy seeds. 

5. Evenly divide the batter between the two greased loaf pans and bake for 60 minutes, or until an inserted toothpick comes out clean.

6. Once the pound cake has baked and cooled, cut thick slices and butter both sides of each slice.

7. Halve the nectarines and remove the pits.

8. Lightly oil grill grates, then grill the pound cake slices over medium high heat for one minute, turning halfway through until grill marks appear. Grill the nectarine halves flesh side down until the fruit is hot and sweating, roughly 3-5 minutes.

9. Cool the nectarine halves, then cut them into thin slices. Combine the butter, sugar, and lemon juice in a small saucepan over medium heat. Stir until the butter melts, the sugar has dissolved and the mixture begins to bubble. Add the nectarine slices and cook in the syrup for 2-3 minutes.

10. Top the grilled poppy seed pound cake with the nectarines and a dollop of crème fraîche. Serve immediately.

Sheet Pan Cherry Pie with Vanilla Ice Cream

Lia Soneson

We love cherry pie. Who doesn’t? This version transforms a traditional round pie into a sheet pan pie, baked in a quarter sheet pan for fuss-free serving to groups of almost any size. The secret addition of nutmeg and black pepper adds surprising warmth and flavor intrigue. Of course, this pie is happily paired with vanilla ice cream, as all fruit pies should be!


Sheet Pan Cherry Pie with Vanilla Ice Cream
Serves 8 - 12

Pâte Brisée Ingredients:

3-3/4 cups all purpose flour, plus extra for dusting
1 tablespoon sugar
2 teaspoons Kosher salt
1-1/2 cups unsalted butter (3 sticks), well-chilled
4 - 8 tablespoons ice water (plus more if needed)
1 egg beaten, for egg wash when attaching the lattice crust and for finishing
Turbinado or raw sugar to finish

Cherry Filling Ingredients:

6 cups pitted sweet cherries (fresh or frozen)
3/4 cup sugar
3 tablespoons cornstarch
1/2 tablespoon lemon juice
2 teaspoons almond extract
1/2 teaspoon nutmeg
1/4 teaspoon black pepper
1/4 teaspoon salt

Directions:

Prepare the Crust:

1. Place the flour, sugar, and salt in the bowl of a foodprocessor. Pulse a few times to evenly distribute.

2. Cut the butter in 1/2" cubes. Use a little of the flour mixture to keep the butter pieces from sticking together. Chill the cut butter cubes for 15 minutes.

3. Prepare the ice water by filling a small bowl with ice cubes and adding water. Stir until the water is well-chilled.

4. Place the butter cubes into the food processor with the flour mixture. Pulse 4-5 times to cut the butter into the flour. The flour-butter mixture will be coarse with some pea-sized pieces of butter remaining. (Resist the urge to keep pulsing.)

5. Add 2 tablespoons of the ice water by sprinkling on top of the flour and butter mixture. Pulse 2-3 times. Continue adding ice water by the tablespoon, pulsing after each addition until a rough dough is formed. Test the dough by pinching together -- if it holds together, enough water has been added. If it crumbles apart, add another tablespoon of water. (Avoid adding too much water, or pulsing too much).

6. Remove the dough fromthe foodprocessor, and gather it into a rough ball. Flatten the dough ball into two rectangles, one a bit larger than the other. Wrap in plastic wrap and chill for 1 hour, or overnight.

7. Remove the larger piece of dough from the refrigerator and place it on a lightly floured surface. Use a rolling pin to roll it into a 14" x 11" rectangle, then transfer it to a 13" x 9" x 1" rimmed baking sheet(a quarter sheet pan). The pastry dough will hang over the sides of the baking sheet. Return to the refrigerator and chill.

Make the Filling:

8. If using frozen cherries, defrost, drain, and pat dry. In a large bowl, combine the cherries, sugar, cornstarch, lemon juice, almond extract, nutmeg, black pepper,and salt, stirring to ensureingredients are incorporated.

9. Pour thefilling intothe prepared baking sheet. Preheat the ovento 375 degrees F.

10. Make the lattice top by rolling out the remaining dough into another 14" x 11" rectangle. Cut 1" wide strips. Reform the dough that doesn't work for the strips and roll out and cut again, to get a total of 15 strips. Lay the strips over the top of the filled pie, spacing them evenly apart, ending on the sheet pan edges. One at a time, with the remaining strips, starting in the middle and working outward, weave the strips perpendicularly through the first layer, using an over and under technique. Trim away any excess dough from the lattice strips that extends past the pan. Brush the edge with an egg wash, including underneath the lattice strips. Press the dough together to create a seal. Brush the lattice with more egg wash and sprinkle with coarse sugar.

11. Bake for 40-45 minutes, oruntil the crust isgolden brown and the cherry filling is bubbling. Place on a wire cooling rack and cool until ready to eat. Serve with a scoop of vanillaice cream.

Pineapple and Coconut Sorbet

Lia Soneson

This pineapple and coconut sorbet is ultra-refreshing! Sweet pineapple mingles with rich coconut flavors in a pleasing, smooth frozen treat. The tropical tastes will have you dreaming about the beach!


Pineapple and Coconut Sorbet
Makes about 1 quart

Ingredients:

4 cups fresh or frozen pineapple chunks
1 tablespoon fresh lime juice
1 can full-fat coconut milk
2/3 cup sugar
1 teaspoon vanilla extract
2 tablespoons shredded coconut, for garnish if desired

Directions:

1. Peel and cut the pineapple into chunks.

Tip: To easily cut up a whole pineapple, use a large chef’s knife and cutting board. First, twist off the leafy top, then trim off both ends. Stand up the pineapple and trim off all of the rind. Cut into quarters, then trim away the tough inner core. Finally, cut the quarters into chunks.

Tip: If you'd like to present the final sorbet in a pineapple half for an extra tropical flare, cut the entire pineapple in half leaving the leafy top intact. Then, use a paring knife to carve out the fruit leaving the rind as a shell. Trim the core off of the removed pineapple and cut into chunks. Wrap the hollowed out half securely in plastic wrap. Refrigerate until ready to serve the sorbet in the scooped out half.

2. Once you've cut up the pineapple, you're ready to prepare the sorbet base. In a blender or food processor, puree the pineapple chunks with the lime juice, coconut milk, sugar, and vanilla until very smooth.

3. Once the sorbet base is pureed well, pour the base through a fine mesh strainer to remove any larger chunks or pieces of rind. Use a wooden spoon to help the puree get through the strainer.

4. Chill the sorbet base for at least 1 hour.

5. Once ready to churn the sorbet, place the sorbet base mixture into the freezing unit. Follow the instructions for your ice cream maker to churn the sorbet.

Tip: If using an ice cream maker with an insert, make sure the insert is completely frozen before attempting to churn. Freeze the insert for at least 24 hours and make sure it is upright in the freezer for even freezing. Chilling the sorbet or ice cream base will also make the churning process more successful.

6. Once the mixture becomes frozen, serve immediately for a soft-serve style. Or, transfer to a lidded container and freeze until serving time.

7. If desired, scoop the sorbet into the hollowed out pineapple half for an extra tropical presentation! Garnish with shredded coconut, if desired.

Grilled Chicken Rainbow Kabobs

Lia Soneson

Try these colorful chicken kabobs tonight! Fresh, boneless chicken and a medley of vegetables are marinated, skewered, then grilled to perfection. You’ll find these kabobs both pleasing to the eye and palate!


Grilled Chicken Rainbow Kabobs
Makes 6-8 long kabobs

Ingredients:

2 boneless and skinless chicken breasts (about 1-1/2 lb), cut into 1-1/2” cubes
1 red pepper, cut into 1-inch chunks
1 orange pepper, cut into 1-inch chunks
1 summer squash, cut into 1/2-inch slices
1 zucchini, cut into 1/2-inch slices
1/2 red onion, cut into 1-inch chunks
10 leaves of basil,chiffonade cut for optional garnish

Marinade:

1/4 cup soy sauce
1 teaspoon Worcestershire sauce
2 cloves garlic, minced
2 tablespoons honey
1 tablespoon Dijon mustard
1/4 cup freshly squeezed lemon juice
3 tablespoons olive oil
2 teaspoons hot sauce
1 teaspoon oregano

Directions:

1. Mix all of the marinade ingredients together in a medium bowl and whisk until combined.

2. Cut the chicken into 1-1/2-inch cubes and pour 3/4 of the marinade over the chicken. Stir until the chicken is well-coated. Cover and refrigerate. Allow the chicken tomarinate for 1-4 hours.

3. Prepare the vegetables. Cut the peppers into chunks that will easily fit on skewers. Slice the summer squash and zucchini into even slices and cut the red onion into chunks. Place the veggies in a large bowl and drizzle with the remaining 1/4 of the marinade. Carefully toss the vegetables in the marinade. Cover and refrigerate until ready to assemble the skewers.

4. Assemble the kabobs. Rub each skewer with a little olive oil before skewering the meat and veggies. This will help later when removing the grilled food from the skewers. Skewer the marinated chicken pieces onto each kabob stick alternating with pieces of red pepper, orange pepper, summer squash, zucchini, red onion. Work over a large sheet pan while assembling the skewers. The process can get a little messy, and the sheet pan helps to contain drips. Clean-up is infinitely easier and countertops are left contaminated.

5. Prepare the grill until very hot. Make sure that the grilling grate is clean and well-oiled. Grill the kabobs for 2-3 minutes on each side or until the internal temperature of the chicken reaches 165 degrees F.

6. If desired, garnish the kabobs with a sprinkle of fresh basil leaves cut in a chiffonade style.

7. Serve and enjoy immediately!

Brown Sugar, Chili-Rubbed Ribeye Steaks with Herb Butter

Lia Soneson

Looking for a special dinner to celebrate Dad? Try our brown sugar and chili-rubbed ribeye steaks made on the grill. The brown sugar caramelizes as the steaks grill creating a rich, slightly sweet and savory experience with every bite.


Brown Sugar, Chili-Rubbed Ribeye Steaks with Herb Butter
Serves 2

Ingredients:

2 ribeye steaks

Brown Sugar + Chili Steak Rub Ingredients:

4 teaspoons Kosher salt
2 teaspoon black pepper
1 tablespoon chili powder
1/4 teaspoon cayenne pepper
1 teaspoon garlic powder
2 tablespoons brown sugar

Herb Butter Ingredients:

6 tablespoons butter, softened
1 teaspoon honey
1/4 teaspoon cayenne pepper
1/4 teaspoon Worcestershire sauce
1 tablespoon fresh basil, finely chopped
1 tablespoon fresh parsley, finely chopped
1 tablespoon fresh cilantro, finely chopped

Directions:

1. Mix all of the steak rub ingredients together in a small bowl until well combined. Coat the steaks generously on all sides with the rub. Press and rub the seasoning into the steak. Allow the steak to come to room temperature for about 30 minutes to one hour before grilling.

2. Prepare the herb butter. Mix the softened butter with the honey, cayenne, Worcestershire sauce, and minced herbs. Place on a square of parchment paper. Roll and form into a log shape. Twist both ends of the paper to secure the log. Refrigerate or freeze the butter until ready to use.

3. Fire up the grill, bringing the heat to a high temperature. Make sure the grill is clean and well-oiled.

4. Once the grill is hot, place the steak on the grill, and sear the first side for 5 minutes. Cover the grill during cooking and avoid the urge to check or move the steak around. During this time, a seared crust will form assisting in keeping the juices within the steak.

5. After the five minutes, flip the steak once, and sear on the other side for 3-5 minutes (depending on the thickness of the steak). Take the temperature of the steak, and determine the desired doneness. We prefer our steaks at about 130 degrees F for a rare to medium-rare steak.

6. If the steak needs to cook longer, turn the burners down to low, or move to an indirect area of the grill until the steak reaches the desired doneness. Check the temperature every few minutes to avoid overcooking the steak.

7. Once the steak reaches the desired doneness, remove it from the grill and let it rest for 5-7 minutes. Don't slice into it, or wrap it, just let it rest. While the steak rests, place a few pats of the herb butter on the top, and let them slowly melt into the seared crust.

8. After the steak rests, serve and enjoy!

Burgers with a Bacon and Onion Whiskey Sauce

Lia Soneson

Time to fire up the grill! Take your burger game from ordinary to incredible this season with some fresh inspiration. Our burgers are loaded with some of our favorite toppings -- crispy bacon, sharp cheddar cheese, arugula, and onions that are bathed in a decadent whiskey sauce. The result? Over the top delicious!


Burgers with a Bacon and Onion Whiskey Sauce
Makes 4 burgers

Burger Ingredients:

1-1/2 lb ground beef (80/20)
1 teaspoon Kosher salt
1/2 teaspoon pepper

Bacon and Onion Whiskey Sauce:

4 slices bacon, cooked and cut in half, reserve 1-2 tablespoons of bacon grease
1 sweet onion, sliced pole-to-pole
1/3 cup brown sugar
1/2 teaspoon Kosher salt
1/2 teaspoon pepper
1 teaspoon Worcestershire sauce
1 ounce whiskey

Burger Fixings:

4 slices sharp white cheddar cheese
4 hamburger buns, grilled
arugula
mayonnaise, if desired

Directions:

1. In a large bowl, mix the ground beef with the salt, and pepper. Divide the mixture into four equal portions, and then shape into 4 burger patties -- each about 4 inches in diameter.

BURGER TIPS: Wet your hands with water or a little olive oil before forming burgers for easier hand washing after! Use parchment paper between the formed burgers for easier placement on the grill.

2. Prepare the bacon and onion whiskey sauce. In a skillet, cook the bacon until crispy, then remove the bacon and let drain on a paper towel-lined plate. Reserve between 1-2 tablespoons of bacon grease in the skillet for cooking the onions. Carefully discard any excess bacon grease. Slice the onions pole-to-pole, then cook the onions in the reserved bacon grease until they begin to brown and caramelize. Sprinkle the cooked onions with the brown sugar, salt, pepper, and Worcestershire sauce. Cook until the sugar is dissolved. Add the whiskey, and let the mixture bubble and cook for a few more minutes. Set the saucy onions aside until ready to assemble the burgers.

3. Grill the burgers on a medium-hot, well-oiled grill, or on a cast iron griddle for about 4 minutes per side until the internal temperature reaches 160 degrees F.

4. Once the burger has cooked, add a slice of sharp white cheddar cheese to each burger, and let melt. Place the cooked burgers on a clean plate and let rest them for five minutes.

5. While the burgers are resting, grill the buns until lightly toasted.

6. Assemble the burgers. Place a handful of arugula on the bottom bun. Add the grilled beef patty (with the melted cheese). Layer on a few slices of bacon, then spoon on the onion whiskey sauce. Top with the other bun half (slathered with mayonnaise if desired). Serve while hot

Greek Orzo Salad

Lia Soneson

This hearty salad is packed with plenty of goodness! A generous helping of farm-fresh, finely diced veggies along with nutty orzo create a delicious melange of wonderful flavors. Tossed with a lemony-garlic vinaigrette, and topped with fresh herbs and crispy, salty halloumi cheese, this nourishing salad comes together in a snap!


Greek Orzo Salad
Makes 8-10 servings

Salad Ingredients:

1 teaspoon salt
16 oz orzo
16 oz grape tomatoes, halved
1 cup pitted Kalamata olives, halved
1 English cucumber, quartered and diced
3-5 mini red bell peppers, diced
3-5 mini orange bell peppers, diced
1/2 red onion, finely diced
1/4 cup fresh mint, chopped
1/4 cup fresh dill weed, chopped

Halloumi Ingredients:

8 oz halloumi cheese, drained, and cut into 1/4" slices
1 tablespoon canola oil

Vinaigrette Ingredients:

1 teaspoon dried oregano
3 cloves garlic, crushed
1/2 cup olive oil
1/4 cup fresh lemon juice
1/4 cup red wine vinegar
1 teaspoon honey
1/2 teaspoon Kosher salt
1/2 teaspoon black pepper

Directions:

1. In a large pot, boil water. Once boiling, add salt and the orzo. Cook for 5-7 minutes, or until the orzo is al dente. Drain the orzo with a colander and run it under cool water to stop the cooking process. Set aside.

2. Wash the vegetables, pat dry. Cut the tomatoes and olives into halves. Chop the cucumber, peppers, and onion into a fine dice. Coarsely mince the herbs. Place all in a large bowl.

3. Mix all of the vinaigrette ingredients together in a deep measuring cup, jar, or bowl. Whisk vigorously until well-combined.

4. Dry the halloumi cheese with paper towels. Add the canola oil to a skillet over medium-high heat, and allow to warm until the oil is hot. Pan fry the halloumi, turning with tongsuntil both sides are nicely golden brown -- about 1-2 minutes per side. Remove from the panand cut into 1" pieces.

5. Add the cooked orzo to the vegetables, drizzle with the vinaigrette and toss until the ingredients are well-coated. Add additional salt and pepper to taste. Top the orzo salad with the fried halloumi pieces. Eat immediately.

Temaki Sushi Hand Rolls

Lia Soneson

Also referred to as a "hand roll" because of it's perfectly hand-sized cone size and shape, temaki sushi is not only delicious, but offers customization and versatility in its ingredients, depending on your location, the season, and personal preference. This recipe is for maguro (tuna), but the sky is the limit when it comes to making these beautiful hand rolls.


Temaki Sushi Hand Rolls
Makes 8 pieces

Sushi Rice Ingredients:

2 cups short grain white sushi rice
2 cups water
2 tablespoons rice vinegar
1 tablespoon white sugar
1 teaspoon salt

Temaki Roll Ingredients:

4 sheets of nori (dried seaweed)
8 oz sashimi grade raw tuna
2 Japanese or Persian cucumbers
1 small avocado
2 green onions
1/2 tablespoon wasabi paste
1 tablespoon toasted sesame seeds
4 tablespoons sashimi grade ikura (salmon roe)

Serve With:

soy sauce

Directions:

1. Prepare the rice. Rinse the rice in a colander until the milky water runs clear. This releases any excess starch, and helps to keep the rice from becoming gummy.

2. Combine the rice and water in a small, lidded pot and stir to incorporate. Cover and cook over medium-high heat until the water begins to boil. Reduce the heat to low, keep covered, and cook until the rice is tender and the water has been absorbed -- about 18-20 minutes. If using a rice cooker, turn the rice cooker on, add the rice and water, stir to incorporate. Press the rice down with your hand until the water just covers your hand. Remove your hand and close the lid. Select the 'white rice' function. After cooking, let the rice sit for 5 minutes to absorb any remaining moisture.

3. Meanwhile, in a small, microwave-safe dish, combine the rice vinegar, sugar, and salt and microwave for 30 seconds, stirring to ensure the sugar and salt have completely dissolved. Remove the rice from the rice cooker, or stovetop, and place in a large bowl. Pour the vinegar mixture over the rice and use a flat paddle to gently fold the mixture to integrate the flavors. Cover the bowl with a towel and set aside.

4. Cut the nori sheets in half.

5. Prepare the temaki roll ingredients. With a clean, sharp knife, cut the raw tuna into strips. Cut each cucumber into 4 equal sticks removing the seeded center. Halve the avocados, remove the pits, and slice the avocado into strips. Chop the green onions.

6. Assemble the temakisushi by laying a halved nori sheet horizontally, with the rough side up (this helps grip the rice). With the back of a spoon, carefully spread a thin layer of sushi rice on the left half of the nori sheet, leaving a 1/2" border.

7. Diagonally spread a thin layer of wasabi on the rice. Sprinkle with the toasted sesame seeds.

8. Place one strip of the tuna, cucumber, and avocado, diagonally on the rice. Sprinkle with green onion and salmon roe.

9. From the bottom left corner, diagonally fold up the nori to the top center of the nori sheet.

10. Roll the right side of the nori sheet around the cone, using a dab of water to help secure the sheet to itself, and then place seam side down to serve. (This same method may be used for other variations. Swap fillings for salmon, yellowtail, uni, scallop -- really, whatever your heart desires.

11. Serve temaki sushi with soy sauce. Enjoy!