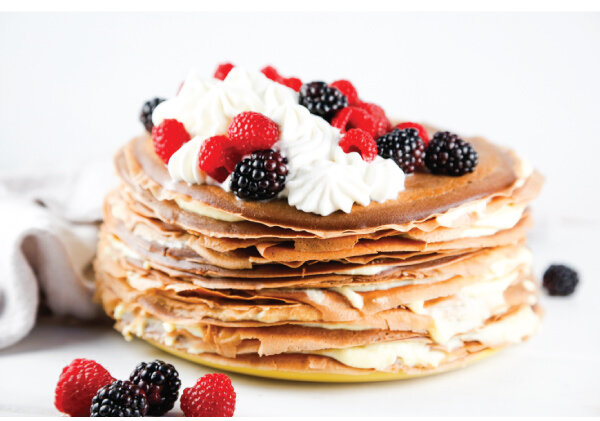
Chocolate Crêpe Cake
Makes one 8-inch cake - Serves 8-10
Chocolate Crêpe Ingredients:
Makes about 30 (8-inch) crepes
12 eggs
5 cups whole milk
1/2 teaspoon Kosher salt
2/3 cup unsweetened cocoa powder
2/3 cup sugar
1 tablespoon vanilla extract
1 cup butter, melted
3 cups flour Canola oil for coating the cooking surface
Vanilla Custard Filling Ingredients:
Makes about 6 cups
2 cups whole milk
1 cup heavy cream
3 large eggs
3 large yolks
3/4 cup sugar
1/4 teaspoon Kosher salt
3 tablespoons cornstarch
1/2 tablespoon pure vanilla extract
6 tablespoons unsalted butter, cut into 1/2-inch cubes
Whipped Cream Topping Ingredients:
1 cup heavy whipping cream
1/4 cup powdered sugar
1 teaspoon vanilla extract
Garnishes:
Additional cocoa powder for dusting
Fresh raspberries
Fresh blackberries
Directions for Making the Crepes:
1. Prepare the crêpe batter: In a food processor or blender, mix the eggs, milk, Kosher salt, cocoa powder, sugar, and vanilla extract together. Blend thoroughly. Add the melted butter and blend again. Add the flour to the mixture and mix until just combined; do not over mix. The batter should be the consistency of heavy cream.
2. Allow the batter to sit for several hours or overnight in the refrigerator. This chilled resting period is key to forming a good batter.
3. When it’s time to make the crêpes, prepare a landing place for the finished crêpes by lining a plate with a layer of parchment paper. Prepare several pieces of parchment paper to place between the cooked crêpes.
4. Heat a crêpe pan or nonstick skillet over medium heat. Swipe the cooking surface with a canola oil-soaked paper towel. Pour 1/3 cup batter on to the hot skillet and immediately swirl the batter to coat the surface. The batter will quickly set and the top will become dry looking with little bubbles forming. Once you're able to loosen the edges of the crêpe and check the bottom for golden brownness; about 1-2 minutes, flip the crêpe and cook the other side for another 30 seconds - 1 minute. Remove the finished crêpe from the pan and place on a waiting plate. Repeat until all of the batter has been used, about 25-30 crêpes (not a thousand!).
5. Allow the crêpes to cool. Wrap the entire stack well, once cooled, to prevent drying out and to prevent odors from invading the flavor of the crêpes until ready to assemble the cake.
Directions for Making the Vanilla Custard:
1. In a large saucepan, heat the milk to scalding.
2. In a large bowl, whisk together the cream, eggs, egg yolks, sugar, salt, and cornstarch until smooth. If necessary, strain through a fine sieve. Stream in 1/2-cup of the hot milk while stirring continuously. Gradually add the remaining hot milk continuing to stir constantly. (This process, known as “tempering,” gradually increases the temperature of the mixture without curdling the eggs and egg yolks.)
3. Pour the mixture back into the same large saucepan used to heat the milk and cook over medium-low heat, stirring constantly until the mixture thickens to a thin custardy consistency (it will continue to thicken as it cools). Remove from the heat.
4. Add the vanilla extract and cubes of butter. Stir until the butter is melted and combined into the mixture. Set the mixture aside to cool to room temperature. Place a piece of plastic wrap on the surface of the pastry cream to prevent the formation of a “skin.” Store in the refrigerator until ready to assemble the crêpe cake.
Directions for Assembling and Finishing the Crêpe Cake:
1. Smear a teaspoon of the vanilla custard filling in a circle on the bottom of the presentation plate. This will help to steady the final stack of crêpes.
2. Place a crêpe, centered, on the plate. Spread about 2-3 tablespoons of the vanilla filling on top and spread in a thin, even layer. Repeat the sequence of alternating layers until all the crêpes are stacked finishing with a crêpe.
3. Wrap the cake well to prevent drying out and to deter any odors in the refrigerator transferring to the dessert. Chill the assembled cake for 4 hours or overnight.
4. Just prior to serving, whisk the heavy whipping cream, powdered sugar, and vanilla extract, until the sugar is dissolved. Whip the mixture to stiff peaks. Use a piping bag and star tip, pipe the whipped cream on top of the gâteau in an interesting design of your choice. Garnish with fresh berries.
5. To serve, cut narrow wedges of the crêpe cake with a long knife. Lay each slice on its side on an individual dessert plate to display the thin layers. Serve with extra whipped cream and berries.