Contact Us

Use the form on the right to contact us.

You can edit the text in this area, and change where the contact form on the right submits to, by entering edit mode using the modes on the bottom right. 

2210 Haines Avenue
Rapid City, SD, 57701
United States

605-341-5044

Someone's In the Kitchen is an independent, gourmet kitchenware store in Rapid City, South Dakota. We are your shop for "all things kitchen". Enjoy a leisurely shopping experience in the world of kitchen and home.

RECIPE ARCHIVE IV

Filtering by Tag: baking

Chocolate Orange Holiday Cookies

Lia Soneson


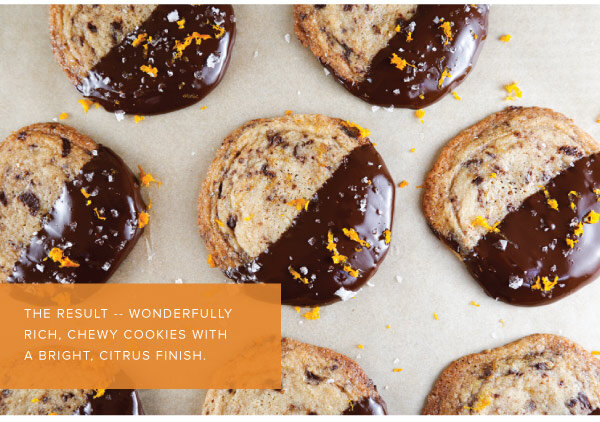
The flavors of chocolate and orange are a classic holiday duo for well-deserved reasons! In this recipe, rich dark chocolate is paired with light and bright citrus, resulting in a cookie that tastes so sophisticated, you’ll be happy you if you chose to make a double batch!

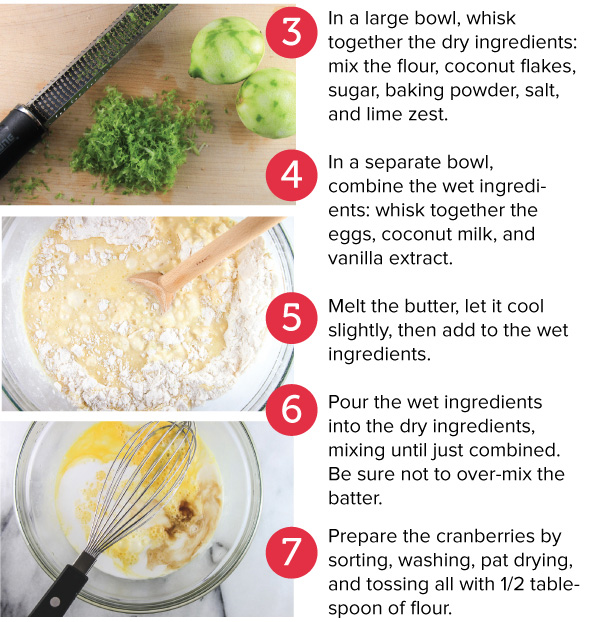
Chocolate Orange Cookies - Slice & Bake
Makes about 24 cookies

Ingredients:
1 cup unsalted butter, softened
1/2 cup light brown sugar, packed
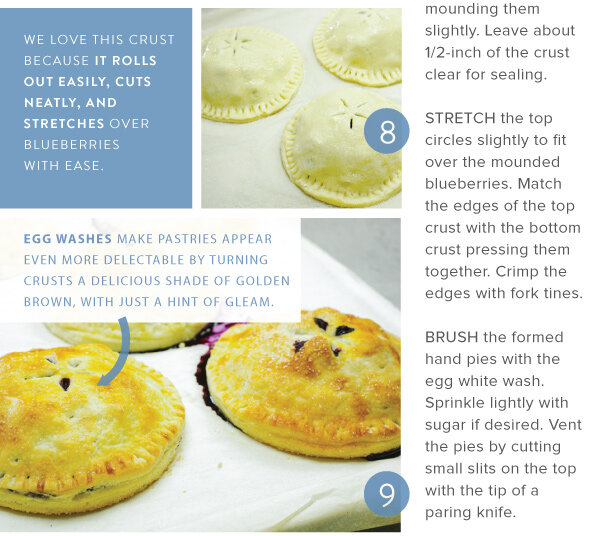
1-1/4 cups granulated sugar
1 large egg, room temperature
1 teaspoon pure almond extract
1 teaspoon freshly squeezed orange juice
2-1/4 cups all purpose flour
1/4 teaspoon salt
1/4 teaspoon cardamom
1 tablespoon orange zest (about 1 medium orange)
4 oz dark chocolate chunks, finely chopped, plus 16 oz dark chocolate chunks for melting
Coarse sugar for rolling, (such as sugar in the raw)
Flake sea salt
Additional orange zest for sprinkling

Directions:
1. In a stand mixer with a paddle attachment, beat the butter on medium speed until smooth. Add the sugars and beat on medium until light and fluffy. Add the egg and almond extract and beat on high speed until the ingredients are fully combined, roughly 5 minutes. Scrape down the sides and the bottom of the bowl with a spatula as needed. Add the orange juice and continue mixing for another minute.

2. Sift the flour in a separate bowl and mix in the salt and cardamom. Slowly add the dry ingredients to the wet ingredients 1/2 cup at a time, mixing on low speed until fully incorporated. Fold in the orange zest and the 4 oz of finely chopped chocolate until evenly distributed. Gather and remove the dough from the mixer.

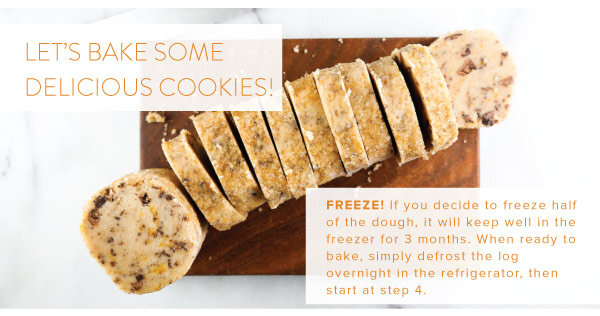
3. On a floured surface, divide the dough in half. Roll each half into a log, about 2-1/2 inches in diameter, and wrap in plastic wrap. Completely chill the dough (for at least 2 hrs, or for up to 1 week).

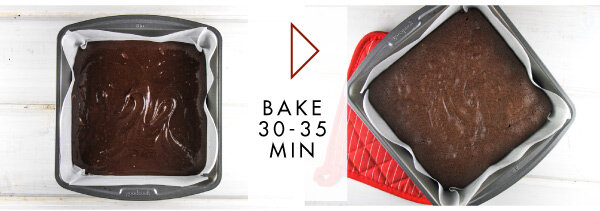
4. When ready to bake, preheat the oven to 350°F. Remove one of the dough logs from the refrigerator. Roll the logs in the coarse sugar and use a sharp, serrated knife to slice the log into individual rounds, roughly 1/2" thick. Place the cookies on a large cookie sheet, roughly 2" apart and bake for 12 minutes, or until the edges of cookies are just starting to brown. Cool on the cookie sheet for 2 minutes, then transfer to a cooling rack.

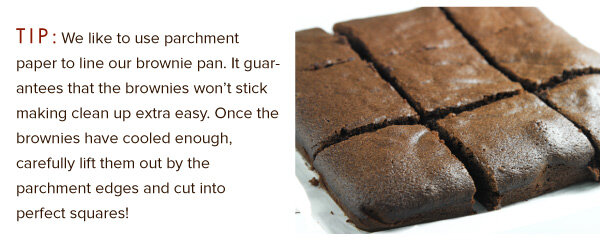
5. While the cookies are cooling, melt 16 oz of chocolate in a double boiler or in the microwave (careful not to burn the chocolate if microwaving!). Dip each cookie halfway into the chocolate to coat one half, and place the half-coated cookie on a parchment paper, or a silicone-lined baking sheet. While the chocolate is still warm, sprinkle the cookies with the flake salt and orange zest. Place the baking sheet in the refrigerator for about 30 minutes to allow the chocolate set.

Store the cookies in the refrigerator to ensure the chocolate stays set.


Roasted Garlic and Rosemary No-Knead Dutch Oven Bread

Lia Soneson


Bread. What’s not to love? A crunchy crust and soft, airy interior are just the beginning of our obsession. We love this recipe because it packs a serious flavor profile with minimal effort. It’s great for beginners, and takes less than three hours from start to a tasty finish. IN THIS ISSUE, we walk through the techniques of baking Dutch oven bread, and offer various success tips to inspire both novice and pro bakers alike!

Roasted Garlic and Rosemary No-Knead Dutch Oven Bread
Makes 1 loaf

Bread. What’s not to love? A crunchy crust and soft, airy interior are just the beginning of our obsession. We love this recipe because it packs a serious flavor profile with minimal effort. It’s great for beginners, and takes less than three hours from start to a tasty finish. A great recipe to inspire both novice and pro bakers alike!

Bread Ingredients:
1-1/2 teaspoon instant yeast
1-1/2 cups warm water (105° F)
1 teaspoon honey
1-1/2 teaspoon sea salt
2 tablespoons fresh rosemary, finely chopped
3 cups all purpose flour
1/2 teaspoon cornmeal
1 tablespoon olive oil, divided
1/2 teaspoon coarse/flaked sea salt

Roasted Garlic Ingredients:
1 head garlic
1 teaspoon olive oil

Directions:
1. Heat the oven to 400°F. Cut o the top of the garlic bulb to expose the cloves and place in a garlic roaster or a square of aluminum foil. Drizzle the garlic with the olive oil and cover. Or, in the case of foil, twist the corners at the top to prevent any oil drips during roasting. Roast for 30 minutes or until the cloves are soft and slightly browned. Remove from the oven and cool. Once cooled, use a small fork to remove the cloves from the head of garlic. Mash the soft cloves into a paste-like consistency.

2. Meanwhile, combine the yeast, water, and honey in a large mixing bowl. Let the mixture stand for about 5 minutes to allow the yeast to activate (the mixture should become slightly foamy.)

3. Add the mashed garlic, salt, and rosemary to the yeast mixture. Slowly add the flour to the mixing bowl in one cup increments, stirring with a wooden spoon until all the ingredients are incorporated. Do not over mix; the dough will be quite shaggy and sticky, yet will form a loose ball in the bowl.

4. Sprinkle the dough with a small amount of flour on top. Cover the bowl with a kitchen towel. Let the dough rise on the counter in a draft-free area for about 1 hour, or until it has roughly doubled in size.

5. On a lightly floured surface, with lightly floured hands, gently guide the dough into a ball. Place it back in the bowl, cover, and let the dough rise for another 30 minutes.

6. Preheat the oven to 450°F. Lightly coat the inside of an empty 5.5 qt. Dutch oven with 1/2 tablespoon of olive oil. Place the lid on the Dutch oven and put it in the middle of the oven. (Be sure to preheat the Dutch oven as the oven preheats; to avoid cracking of the pot’s enamel; never place a cold, empty Dutch oven in a hot oven.)

7. Lay a piece of parchment paper on the counter and sprinkle corn meal on the paper. Gently guide the risen dough out of the bowl and onto the parchment paper. Use the sides of the parchment paper to tip and coax the dough back into a circular form if it has lost its shape. Take care not to deflate the risen dough. Use oven mitts to remove the Dutch oven from the hot oven. Use the parchment paper to transfer the dough into the preheated Dutch oven. Brush the top with the olive oil. Use kitchen shears to cut an “X” on the top of the dough. Sprinkle the sea salt across the top.

8. Cover the bread with the Dutch oven lid. Use oven mitts to transfer the Dutch oven back into the oven. Bake for 30 minutes, until the bread is lightly browned. Remove the lid and cook for another 10 minutes, until the crust is nicely browned. The bread’s internal temperature should be between 195 - 210°F.

9. Cool on a cooling rack, then devour while warm, preferably with a healthy dose of butter and salt.


Peach-Blueberry Cobbler

Lia Soneson

 
Cobbler_v1_01.jpg

Fresh, ripe blueberries and peaches are truly one of the best parts of summer. The window is short; enjoy both in as many ways as you can! Definitely include this cobbler on your culinary bucket list a couple of times before the season is over. There are many types of cobbler - some cake-like, others with a more biscuit-like character. This time around, we’re featuring a fabulous biscuit-type topping. Slightly sweetened biscuits bake atop a pan of bubbling fruit. The only thing left to do is scoop your favorite vanilla ice cream on top!


Peach & Blueberry Cobbler 

Serves 4 - 6


Fresh, ripe blueberries and peaches are truly one of the best parts of summer. The window is short; enjoy both in as many ways as you can! Definitely include this cobbler on your culinary bucket list a couple of times before the season is over. There are many types of cobbler – some cake-like, others with a more biscuit-like character. This time around, we’re featuring a fabulous biscuit-type topping. Slightly sweetened biscuits bake atop a pan of bubbling fruit. The only thing left to do is scoop your favorite vanilla ice cream on top!

Filling:
6 peaches, pitted, peeled, sliced
2 cups blueberries, washed and destemmed
1 tablespoon lemon juice, freshly squeezed
1/8 cup white sugar
1/8 cup brown sugar
1 tbsp cornstarch
1/8 teaspoon cinnamon
1/8 teaspoon salt

Topping:
1-2 tablespoons butter, melted
1 tablespoon white sugar
1/8 teaspoon cinnamon


Directions:
1. Preheat the oven to 425°F. Prepare a ceramic baking dish (about a 2-quart capacity) by lightly buttering.

2. Prepare the filling. Prepare the peaches by peeling, pitting, and slicing into thin, crescent-shaped slices.

3. In a large bowl, add the blueberries to the peach slices. Sprinkle with the white sugar, brown sugar, cornstarch, cinnamon, and salt. Stir until combined.

4. Place the peaches and blueberries in the prepared baking dish and place in the oven for 20 minutes to jumpstart the baking process.

5. Meanwhile, prepare the biscuit topping. In a large mixing bowl, mix together the flour, sugar, baking powder, and salt. Stir to evenly combine the ingredients.

6. Add half of the diced butter to the flour mixture and combine well with a pastry blender or fork. Add the remaining diced butter and continue to blend leaving pea-sized pieces of butter.

7. Add the vanilla extract to the milk. Add the milk mixture to the flour-butter mixture, and stir together until a rough dough is formed. Turn out the dough onto a lightly floured board and gather the dough together. Knead 2-3 times to form a dough ball. Flatten the dough ball to about a 1/2-inch thickness.

8. Using a 2-inch biscuit cutter, cut circles of dough.

9. Place the biscuits on top of the hot fruit in the baking dish. Brush the tops of each dough piece with melted butter. Extra biscuit dough? Simply bake in the oven on a baking sheet until golden brown.

10. In a small bowl, stir together the sugar-cinnamon topping. Sprinkle the mixture on top of the entire dish.

11. Continue baking in a 425°F oven until the biscuit dough is cooked through and the tops nicely golden brown, about 15 more minutes. Remove from the oven and allow to cool for 30 minutes.

12. Serve warm (not hot) with your favorite vanilla ice cream.


Make Your Own Summer Blueberry Hand Pies

Lia Soneson

 
Blueberry_HandPies_v1_01.jpg

SUMMER BLUEBERRIES burst with a flavor that only happens when truly in season. One of our favorite ways to celebrate these little nutritional powerhouses is to place them in hand pies. The berries’ diminutive size fit neatly into petite packets, which highlight the rich cream cheese-based crust — a truly mouth-watering match!


A Seasonal Treat! Sweet Biscuit Strawberry Shortcake

Lia Soneson

 
Strawberry_Shortcake_v2_01.jpg

One of our favorite ways to enjoy fresh strawberries is as strawberry shortcake -- the biscuit kind, not the cake kind. We grew up with this treat, so its seasonal comeback revives all kinds of wonderful memories in addition to all the great tastes! In this recipe, chopped strawberries are added to the biscuit dough, which makes the biscuits sweeter, and the biscuit color a lovely shade of pink! 


For the Love of Chocolate! Our Best Brownies

Lia Soneson


Love appears in our lives in many ways every day of the year, but it's fun to acknowledge and celebrate our affections with a day dedicated to those that are special in our lives. Some mark the occasion with cards or flowers, however, we think homemade sweets say it best! IN THIS ISSUE, we're celebrating with Classic Cocoa Brownies, our Best Ever Blondies (which are loaded up with goodies!), and Walnut Brownie Cupcakes. Let's get baking!